


❤️Go Hang It! Pro – All-in-One Picture Hanging & Leveling Kit
❤️Go Hang It! Pro – All-in-One Picture Hanging & Leveling Kit
SALE ENDS SOON
Couldn't load pickup availability

❤️Go Hang It! Pro – All-in-One Picture Hanging & Leveling Kit



Discount applied automatically at checkout
- Secure checkout SSL encrypted, never stored
- 30-day returns Exchange or full refund
- Tracked shipping Live tracking on every order
Place the Frame.
Mark the Spot. Hang It Straight.
Skip the ruler math and repeated wall holes. This picture-hanging system transfers the hanger position directly to the wall, helps you level the frame, and keeps the essential hardware in one compact kit.

Stop Measuring the Frame, the Hook, the Wall—and Then Measuring Again.
Instead of calculating the distance from the frame edge to the hanger, position the frame where you want it and use the tool to create a physical wall reference for the hardware location.

Insert. Level. Press. The Nail Point Is Marked.
MagneKeys are the shortcut for frames with sawtooth, D-ring or compatible precision hangers. They transfer the hidden hanger location to the wall while the frame is held exactly where you want it.
- Insert the MagneKeys. Place them into the sawtooth, D-ring or compatible precision hanger on the back of the frame.
- Position & level the frame. Set the removable level on the top edge and move the frame until the placement looks right.
- Press to mark. Firmly press over the hanger locations so the MagneKeys leave the nail reference points.
- Install the hardware. Hammer or fasten the appropriate picture-hanging hardware at the marks, then hang the frame.
Hang the Wire on the Tool Before You Hang It on the Wall.
The built-in hooks support the frame wire at the height it will actually hang. Position the frame, remove it, then use the included push pin through the guide hole to mark the wall.
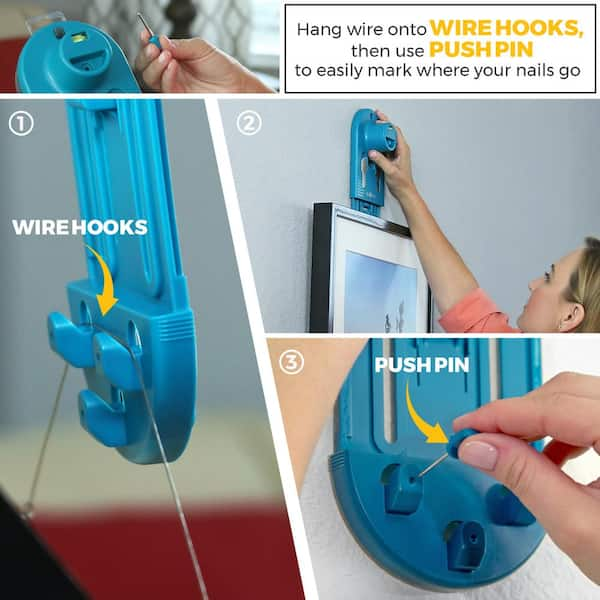
- Extend if needed. Use the center extension for larger wire-backed frames.
- Hook & position. Suspend the frame wire on the built-in hook, then level the frame where you want it.
- Mark the hardware point. Remove the frame and use the push pin through the guide hole before installing the correct wall hardware.
85 Pieces of Picture-Hanging Hardware, Stored With the Tool.
The attached case covers the common parts you are most likely to reach for when hanging photos, framed art and wall décor.

Less Trial-and-Error Means Fewer Unwanted Holes.
The tool is most valuable when placement and alignment matter: photo walls, matching frame sets, hallways, stair landings, bedrooms and new-home decorating.

Measure the frame, calculate the drop, transfer the position to the wall, level it, then hope the hanger lands where expected.
Hold the frame where you want it, level it, create the hardware reference point, then install and hang.
Why Buyers Keep Reaching for It When Another Frame Goes Up.
I was skeptical at first, but the simple positioning method made lining up several frames noticeably easier. Being able to mark the actual hanger position instead of calculating it saved me time.
The all-in-one setup is what I like most. The tool is straightforward to understand, and having the different hanging hardware stored with it means I am not searching the garage for pieces every time.
I normally use a tape measure and separate level, but this made the job faster and more approachable. It is especially useful if measuring and keeping picture placement level is not something you do often.
What to Know Before You Start Hanging.
Do I still need to measure the wall?
For ordinary frame placement, the tool is designed to remove the need to calculate the hidden hanger offset manually. You still may choose to measure spacing when creating a highly structured gallery wall or matching an exact distance from furniture or trim.
What types of frame hangers does it work with?
It is designed for common sawtooth, D-ring and wire-backed frames. MagneKeys are used for sawtooth and D-ring placement, while the built-in hooks and push pin handle wire-backed frames.
What is the removable level for?
The bubble level snaps off the main tool so it can sit on the top edge of your frame while you position it. This helps you establish straight alignment before marking the wall.
Does the kit include hanging hardware?
Yes. The attached case includes 85 pieces such as precision hangers, picture hooks, nails, screws, D-rings and hanging wire.
Can it handle larger frames?
The main body can extend for wire-hanging setups, but the correct fastener and safe load still depend on frame weight, wall material and installation. Use appropriate rated hardware for the specific job.
Do I need any other tools?
You will still need a hammer or the appropriate installation tool for the fastener you choose. For some walls or heavier décor, anchors, a drill or stud-finding equipment may also be required.
Put It Where You Want It.
Mark It. Hang It.
Bring positioning, leveling, wall marking and common hanging hardware into one compact system for photos, artwork and everyday wall décor.
ADD THE PICTURE HANGING KIT ↑🔒 Guaranteed Safe & Secure Checkout
Your payment information is processed securely. Need help choosing or ordering? Contact our support team.


